Wood fences take a beating from the elements. Staining and paints help, but the ravages of sun, wind, rain, and below-ground frost can still damage your fence.
Leaning fences can be repaired by straightening posts, adding support braces, and putting concrete in to stabilize loose ones. Replacing broken or rotten fencing sections typically costs $500 to $2,300. For professional help, contact Fence Repair Round Rock now!
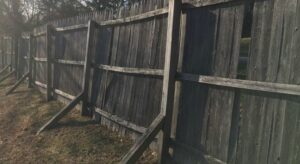
Whether caused by excessive moisture softening the ground, rot weakening the post, or wind or ice putting too much strain on a panel, leaning fence posts are no good. If left untreated, they can eventually fall over or even break completely. Thankfully, these problems are fairly easy to fix.
The first thing you need to do is figure out exactly why the post is leaning. This will help you determine if the post can simply be straightened or needs to be replaced entirely. To do this, push on the post with moderate force and see how easily it gives. This will give you a good idea of how much rot has developed in the post, and if it is so bad that it’s beyond repair.
If it does appear that the post can be saved, you’ll want to brace it for the time being. To do this, nail some long 2×4 boards at a 45-degree angle to the side of the post. This will keep it from falling over and also provide a little extra support while you’re working on the problem. Next, dig around the base of the post on both sides, at least 18 inches and down about two feet. This will allow you to remove any concrete that’s holding the post in place and get a better look at what’s going on underneath.
Once you’ve dug out the old concrete, replace it with new concrete to stabilize the footing. Use a bag of fast-setting cement for this, which costs about $10 per bag and is typically sold at home improvement stores. If you’re having a hard time finding the right mix, ask your local fencing expert for advice.
Once the concrete has set, reattach any fence panels and rails that are attached to the post. If you’ve had to remove a few fence panels for this step, make sure you use the right screws or nails to ensure they stay secure. Finally, test the stability of your leaning fence by pushing on it from different angles. If it still isn’t quite stable, consider removing some of the bracing boards or digging down further to get more concrete in the footing.
Rotted Posts
The wood in fence posts is exposed to water and other elements constantly, which can cause it to rot. This is a serious issue for your fence because if the post is rotting then it will not be strong enough to support the rest of the fence.
Fungus and other microorganisms can cause rot, and the process is accelerated when the wood is submerged in moisture. Once the rot starts it is only a matter of time before the post will snap under high winds or other pressure. Luckily, there are some things you can do to prevent this from happening to your fence posts.
Use a high quality wood preservative, like copper naphthenate, to prevent fungi and bacteria from damaging the posts. This will add a layer of protection to the post and help it last longer. It is important to remember that the preservative will need to be reapplied periodically, so make sure you set up a schedule and follow the manufacturer’s instructions for application.
Even treated fence posts can rot due to prolonged exposure to ground moisture. Fences that are constructed in a way that the posts are directly contact with the ground can quickly decay from this constant moisture. Fortunately, there are ways to prevent this from happening such as using proper installation methods, ensuring adequate drainage, and creating barriers that will prevent direct contact with the ground.
Another way to prevent rot is by choosing the right kind of wood for your fence. You can find a variety of wood species that are naturally more resistant to fungi and other decaying organisms, including cedar, redwood, and acacia. Choosing these more durable woods can save you money in the long run. Also, consider a composite fencing material such as vinyl or composite, which blends the aesthetics of traditional wood with the durability of plastic. This option is more cost effective and can offer the same benefits as a natural wood fence. The best way to protect your fence from rot is by regularly inspecting the posts. This will allow you to catch any early signs of rot or damage and have them repaired quickly before the problem gets worse.
Damaged or Warped Boards
Wood can warp for a variety of reasons, including moisture, changes in temperature, and the type of cut. The good news is that if it’s not too severe, it can usually be fixed by applying heat or weight to the warped piece. It’s also important to do your homework when purchasing wood, making sure it is a quality product. Checking a piece of wood by lining it up with a straight edge on a level, or looking at the edges can help you spot warping.
Using an Iron
If you can get the warped board to sit flat on a surface and then apply heat from above (like on a table or workbench), it’s usually possible to iron out most of the warp. This will reheat the fibers of the wood and make it more pliable. You may have to try this a few times before the board is completely warp free.
Using Sunlight
Another way to fix wood warp is to place it in direct sunlight. Wrap the affected piece of wood in damp towels, ensuring that the towels are large enough to cover the entire affected area. Leave it in the sun for a few days, ensuring that there is plenty of indirect sunlight as well to help with drying.
This method is particularly effective with crook and cup warps, which are caused when the long edges of a wood slat bend inward toward the center of the face. It’s also useful for kink and twist warps, which occur when the corner of a piece of wood deviates from a straight line from front to back.
A few of the most common methods for unwarping wood include heat, water and a mixture of sandpaper of varying grits. Heat makes the wood pliable so you can use clamps to hold it in place and apply pressure. Then, use sandpaper of progressively finer grits to smooth out the area. This will give the area a finished look and can help prevent any future damage to the wood from being too rough or uneven.
Sagging Gates
A fence gate that sags can be an unsightly and even frustrating problem. It might drag on the ground, or it may no longer line up properly with the latch on the other side. If the sagging isn’t addressed right away, it can even prevent you from opening or closing your gate at all.
Fortunately, there are a few simple ways to fix this issue. For one, you can try using a turnbuckle and cable system. This can be a bit more complex than simply replacing or tightening hinges, but it will ensure that the gate is properly supported and won’t sag again in the future.
Another option is to purchase an anti-sag brace kit. These are available at most hardware stores and are typically very easy to install. Most kits include metal corner brackets that can be attached to the gate’s framing on the hinge side, a turnbuckle that can be connected to these corner brackets with cable clamps, and a steel cable that can be tightened up using the turnbuckle.
If you don’t have an anti-sag kit handy, you can also try resetting the lower hinge. To do this, you’ll need to loosen the lag bolt holding the hinge in place and then move it up slightly by hand. Once it’s in the new position, retighten the lag bolt and use a level to make sure that the gate is now perfectly level.
Once you’ve taken care of any sagging in your fence gate, it’s a good idea to do a quick check of the rest of your fence. It’s not uncommon for posts to start leaning or rotting over time, so make sure you look for these issues as well. Using a level or bubble level can help you determine if there’s any unevenness in your fence, and you can then address it accordingly.
When you’re done repairing your fence, be sure to treat it with some high quality stain or paint to protect your investment and prolong its lifespan. This will help it to look great for years to come!